
The overlooked fire-risk area is often the lint-trap housing: the recessed cavity directly beneath the removable screen. Lint, dust, hair and pet debris can slip past the screen and collect there, while heat from the dryer makes accumulated lint a potential ignition hazard. The evidence does not establish that this cavity is objectively “bigger” or more dangerous than the lint trap; it is an easy-to-miss part of the same maintenance system.
What the lint-trap housing is and why it matters
Removing a dryer’s lint screen reveals a narrow cavity that leads toward the blower and exhaust path. The screen catches much of the lint shed by clothing, but it cannot capture every fiber. Fine lint, dust, hair and residue can drop around the screen or cling to the housing walls. Over time, that material can form a wad that restricts airflow or sits near hot components.
As an Amazon Associate I earn from qualifying purchases.
Pet-owning households may see buildup sooner. Fur and dander mix with textile fibers, and blankets, towels, fleece and other high-lint loads shed more material than smooth, lightweight clothing. A clean screen does not prove that the cavity behind it is clear.
The practical point is not a ranking between the screen and its housing. Both are parts of the dryer’s lint-control route, and the recessed area receives less attention because it is hidden when the screen is installed.
#1 Best Overall
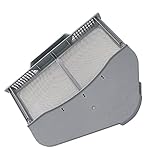
- 【Perfectly Compatible】:DC97-16742A dryer lint trap screen filter with flap replacement compatible with Samsung Dryer and replace these part numbers: DC61-03048A DC97-16742A, DC61-02610A, AP5306681, PS4221839, AP4578784, 2069511, B00D6MDHNG etc. We have listed all matching models in the description. If you're not sure whether or not a parts you're ordering fits your model, please feel free to contact us, We can verify if it will fit
- 【Compatible Models】DV45H7000EW/A2 DV48H7400EW/A2 DV40J3000EW/A2 DVE50R5200W/A3 DVE50R5400W/A3 DV42H5000EW/A3 DV42H5200EW/A3 DVE55A7300E/A3 DV48H7400EP/A2 DV45H7000GW/A2 DVG52M7750V/A3 DV48H7400GW/A2 DV40J3000GW/A2 DV400EWHDWR/AA DV422EWHDWR/AA DV422GWHDWR/AA DV456EWHDWR/AA DV45H7000EP/A3 DV48H7400EP/A2 DVE50T5300C/A3 DV400EWHDWR/AA
- 【Upgraded - Quality】 DC97-16742A lint filter for samsung dryer with durable plastic construction and Upgraded Stainless Steel metal Screen and well-tested by the manufacturer designed to offer a durable and reliable dryer replacement parts - non-original aftermarket parts, Fits OEM Standards
- 【Advantage】: High quality stainless steel material screen-very easy to clean (Can be completely cleaned and reused, saving you money). Durable plastic construction (Can capture lint and debris from the exhaust air from the dryer, helping to increase airflow, maximizing drying efficiency and reducing drying time).Fix these symptoms:Takes too long to dry、lint on clothing、not drying properly
- 【Easy to Intall】 DC97-16742A dryer lint filter replacement for samsung installation is very easy, just remove the old lint trap and insert the new lint trap, your job is complete, it is very suitable and needs to be installed Use more force and wear gloves to protect your hands from injury during installation. Please empty all the lint at the bottom before installation, because the lint will cause gaps
What the available fire data does—and does not—show
Better Homes & Gardens reported that the National Fire Protection Association counted 15,970 home fires involving washers and dryers during 2010–2014. In that historical dataset, 92% were attributed to dryers, and 27% of washer-and-dryer fires were attributed to dust, fiber and lint. Those figures are not current annual estimates, and they describe the combined appliance category rather than proving that one specific dryer cavity caused a fire. The NFPA figures are presented as reported by Better Homes & Gardens; the referenced NFPA landing page was not available for independent verification here.
The Savannah Fire Department advice paraphrased in a June 2025 Chimney Safety Institute of America newsletter recommends regular lint-trap cleaning, not leaving a running dryer unattended, and keeping a smoke alarm near the appliance. Because that advice is relayed by the newsletter, it should be understood as secondary reporting rather than a direct department publication.
Before you clean: make the dryer safe
- Disconnect electricity. Unplug the dryer before inserting a vacuum hose or brush into the lint-screen cavity. If the plug is inaccessible, switch off the appliance’s circuit breaker.
- Shut off gas on a gas dryer. Close the gas supply valve before cleaning. Do not move or disconnect a gas line unless the appliance manual specifically directs it or a qualified technician does the work.
- Let the appliance cool. Cleaning a recently run dryer can expose you to hot surfaces and makes inspection harder.
- Read the manual first. Models differ in how the screen housing is shaped and whether an access panel may be removed. Use a screwdriver only where the manufacturer’s instructions call for one.
- Use suitable tools. Prepare a vacuum with a hose or crevice attachment, a long flexible dryer lint brush, a flashlight and, if the manual permits deeper access, the specified screwdriver. A brush loosens material; the vacuum removes it. Neither tool by itself guarantees a fire-safe dryer.
How to clean under the lint screen
- Unplug the dryer and close the gas valve if applicable. Keep the controls off while you work.
- Remove the lint screen. Set it aside so you can inspect and wash it separately.
- Illuminate the cavity. Use a flashlight to look for a visible mat of lint, clumps of pet hair, dust or a sticky film on the housing walls.
- Vacuum what you can reach. Insert the hose or crevice tool gently and collect loose material from the bottom and sides. Avoid forcing the nozzle into a slot where it could damage an internal part.
- Loosen material with a flexible brush. Feed a long dryer lint brush into the housing without bending or jamming it. Work slowly so the bristles break up compacted lint rather than pushing it farther into the machine.
- Vacuum again. Make a second pass after brushing, then inspect with the flashlight. Repeat only while you can do so without stretching, twisting or dismantling components.
- Reinstall the screen only when everything is dry and clear. Do not operate the dryer with the screen removed.
If the brush repeatedly hits an obstruction, the cavity extends beyond what you can safely reach, or you see wiring, insulation or a damaged component, stop. Follow the model’s service instructions or arrange qualified appliance service instead of probing deeper.
Outdated Drivers Are Slowing You Down
One free scan finds every outdated or missing driver and matches the right update for your exact hardware.Free scan · exact hardware matchWindows Errors? Fix Them Before They Spread
Repair common Windows errors and clear accumulated junk for a smoother, more stable PC - no reinstall needed.Free scan · no reinstallClean the screen itself
A screen can look clean while detergent, fabric-softener residue or a waxy film blocks its mesh. Better Homes & Gardens advises washing a visibly coated screen with warm, soapy water, rinsing it and allowing it to dry completely before putting it back. A wet screen can interfere with airflow, so do not reinstall it damp. Inspect the frame and mesh for tears or gaps; replace a damaged screen according to the appliance manufacturer’s parts guidance.
Rank #2

- Efficient Lint Capture: The Dryer Duct Lint Trap is made from strong, rust-resistant materials that catch lint before it enters your duct system
- Safety and Cost Effective: Protect your home from dryer fires with the indoor dryer vent lint trap; reduce the risk of dryer fires by keeping the dryer duct clean and free of lint
- Easy Installation and Maintenance: Installation is simple and maintaining your lint trap is as easy as cleaning or replacing the filter when needed
- Transparent Door Lid: The clear door allows an unobstructed view of the lint trap, which should be removed and cleaned after each load of laundry
- Standard 4 Inch Dryer Ducts: HOOMESUN's dryer vent cleaning kit is designed for standard 4 inch ducts, preventing lint build-up in your dryer system
The exhaust duct is a separate maintenance job
The housing beneath the screen is only the first accessible section. Air and lint then travel through the dryer’s exhaust duct to the outside. Lint can collect along that route, and a crushed, disconnected or obstructed duct can reduce airflow even when the screen and housing are clean.
| Area | What you can reach | Typical user action | When to escalate |
|---|---|---|---|
| Lint screen | Screen surface and mesh | Remove lint after loads; wash off residue with warm, soapy water and dry fully. | Replace a torn or damaged screen. |
| Lint-trap housing | Recess directly below the removable screen | Unplug first; vacuum, then use a flexible lint brush and vacuum again. | Stop if access requires unapproved disassembly or you encounter wiring or an obstruction. |
| Exhaust duct | Flexible or rigid route from dryer to exterior termination | Inspect the visible connection and outside outlet; consult the manual for cleaning access. | Use qualified vent service when the route is long, inaccessible, damaged or still restricted after user-level cleaning. |
Do not treat a clean housing as proof that the entire duct is clear. Duct layout, length and termination vary by home, so a professional’s inspection scope should include the full route rather than only the short connection behind the dryer.
How often to clean each area
There is no single interval that fits every dryer. Better Homes & Gardens gives general guidance of about every six months for cleaning beneath the lint trap, shortening that to every three to four months for heavy use, pets or lint-producing loads such as towels and fleece. Treat those as starting points, not a universal rule: your manual, visible accumulation and dryer behavior should control the schedule.
The Tool Desk
Outbyte PC Repair FREERepair Windows errors before they cause bigger problemsFix Now →Outbyte Driver Updater FREEFix the driver behind crashes, sound loss and screen glitchesFind Drivers →| Household pattern | Housing check | Why the interval may change |
|---|---|---|
| Light use, little shedding | About every six months as a general starting point | Increase frequency if lint is visible or drying performance changes. |
| Pets, frequent loads or heavy shedding | About every three to four months as general guidance | Fur and textile fibers can fill the cavity sooner. |
| Towels, fleece and other high-lint laundry | Use the shorter interval and inspect more often | These loads can leave more fiber in the screen path. |
The same source gives one to two years as a general exhaust-vent inspection and cleaning interval. That is not a rule for every home: a long or complicated duct, construction dust, a visible exterior blockage or recurring symptoms can justify earlier attention.
Rank #3

- ADQ56656401 filter is NOT UNIVERSAL! PLEASE MAKE SURE your old filter has the SAME SIZE and SAME SHAPE as our ADQ56656401 filter, or it can NOT FIT YOUR DRYER.
- REMINDER 1: This is ADQ56656401 filter, the size of which is 11.9 * 10.9 inch (30.1 * 27.6 cm). Please measure the size of your old filter before the purchase, if your old filter has A DIFFERENT SIZE, this ADQ56656401 filter can NOT FIT YOUR DRYER.
- REMINDER 2: ADQ56656401 filter has a similar shape to ADQ56656403 filter. However, ADQ56656401 filter has TWO EARS ON THE TOP, and is WIDER than ADQ56656403 filter. If your old filter has NO EAR ON THE TOP, this ADQ56656401 filter can NOT FIT YOUR DRYER.
- REMINDER 3: ADQ56656401 filter has a similar shape to 5231EL1003B filter. However, ADQ56656401 filter has NO FELT SEAL, and is SMALLER than 5231EL1003B filter. If your old filter has A FELT SEAL, this ADQ56656401 filter can NOT FIT YOUR DRYER.
- Compatibility: ADQ56656401 filter is NOT UNIVERSAL! It only works for LG and Kenmore dryers with Specific Model Numbers, and replaces part number ADQ566564, 1462822, AH3531962, AP4457244, EA3531962, PS3531962. Part of the compatible model numbers have been listed in the description. If you are not sure whether this lint filter can work for your dryer, please feel free to contact us, we will help you confirm it.
Warning signs that need prompt attention
- Unusually long drying times: restricted airflow from lint, a duct problem or another appliance fault can leave clothes damp after a normal cycle.
- Overheating: excessive heat may reflect poor airflow or a mechanical problem; it is not proof that hidden lint is the only cause.
- A burning smell: stop using the dryer and investigate promptly. Lint buildup, an overheated belt, wiring fault or another issue can produce a similar odor.
- Visible lint around the appliance or outside outlet: recurring escape can indicate a damaged seal, screen problem or duct restriction.
Do not run the dryer to “test” it when a burning smell, abnormal heat or repeated malfunction is present. Disconnect power, shut off gas if applicable, and arrange an inspection or repair that addresses the actual cause.
When DIY cleaning is reasonable—and when it is not
DIY is generally suitable when
- The lint screen housing is plainly accessible from the normal opening.
- You can disconnect power safely and, on gas models, close the supply valve.
- The manual permits the cleaning method and any panel removal you plan to use.
- The buildup is loose or reachable with a household vacuum and flexible lint brush.
Get qualified help when
- The duct disappears into a wall, ceiling or inaccessible chase and you cannot inspect its full route.
- The dryer still overheats, dries slowly or smells of burning after the accessible areas are clean.
- You find damaged wiring, insulation, a crushed duct, a loose gas connection or a component that requires disassembly.
- You are unsure how to isolate a gas appliance or how the model’s service panels work.
If you hire vent service, ask whether the provider will inspect and clean the complete duct route, check the exterior termination and identify airflow restrictions. Availability and scope vary locally; no particular provider or program is established here.
Pet-household habits that reduce buildup
- Shake or brush loose fur from washable pet bedding outdoors before putting it in the washer.
- Do not overload the dryer; crowded loads can dry unevenly and shed more material into the airflow path.
- Empty the lint screen after every load, including loads that contain only pet bedding or towels.
- Keep the area around the dryer free of loose lint, paper, cardboard and other combustible debris.
- Keep a working smoke alarm near the laundry area, and avoid leaving the dryer operating while you are away or asleep.
These habits reduce the amount of debris entering the system but do not replace periodic housing and duct inspection.
Free tools Windows power users keep installed
One-click scans. No signup required.
Common mistakes to avoid
- Cleaning only the visible screen: the recessed housing can hold material that the screen cannot catch.
- Pushing the brush aggressively: forcing it can drive lint deeper or damage internal parts.
- Using a screwdriver without checking the manual: unnecessary panel removal can expose electrical or gas hazards.
- Stopping after the housing looks clean: the exhaust duct remains a separate possible restriction.
- Ignoring symptoms because the screen is empty: slow drying, excess heat and burning odors require investigation.
Choosing a cleaning tool
A flexible dryer lint brush is the most directly useful specialty tool for the housing. Search by that category phrase rather than assuming any particular brand; choose a brush long enough for your model, flexible enough to follow the cavity and easy to clean. Pair it with a vacuum crevice attachment so loosened lint is removed instead of displaced. A brush is a cleaning aid, not a standalone fire-prevention device.
Quick Recap
Product prices and availability are accurate as of the date/time indicated and are subject to change. Any price and availability information displayed on Amazon at the time of purchase will apply.





Leave a Reply